
 About this Article: I’m Chris – an amateur microscopist and trained teacher. This article is from our series on microscopy projects. This site is governed by our terms and conditions, disclaimer and privacy policy posted on the footer of this page. All images on this page are my own. As an Amazon associate I earn from qualifying purchases.
Many beginner microscopes come with a prepared slide that has a fly leg on it. This fly leg activity is one of the first microscopy projects kids and beginners complete.
 Here, I’ll walk you through doing this activity and the facts underpinning a microscopy lesson involving magnified fly legs.
At the heart of this activity is the research question:
“How do Flies Walk on Walls?”
For this lesson, you will look at a fly’s leg under a compound light microscope and attempt to identify the features of a fly’s foot that helps it to grip onto walls.
You’ll then learn the science behind this phenomenon thanks to the research of scientists at the Max Planck Institute for Metals Research in Germany, who researched this phenomenon using super high powered SEM electron microscopes. They wanted to duplicate this phenomenon to create robots that could walk on walls … and they succeeded[2]!
How do Flies Walk on Walls? – A Microscopy Project
1. Preparations
Before completing this project, you will need:
- A compound light microscope that achieves at least 400x magnification
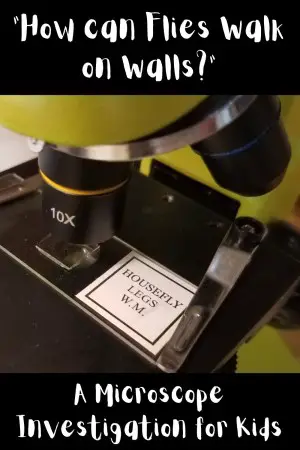
- A prepared slide with a fly leg
To get this equipment, I recommend one of the following methods:
- You can purchase the Levenhuk Rainbow 50L PLUS (get it here), which is my preferred microscope for students. This microscope comes with a prepared fly leg slide.
- You can purchase one of many microscope experiment kits that have fly leg prepared slides (this one has prepared fly leg slides).
- You can get a blank slide and place a recently dead fly’s leg onto the slide. Use a slide cover to secure the fly leg before conducting the observations. You can buy blank slides here.
2. Hypothesis
To begin the session, discuss with the students reasons they may think a fly can walk on walls. Guide the students toward coming up with a one-sentence hypothesis. Examples may include:
- “Flies can walk on walls because they have sticky feet.”
- “Flies can walk on walls because they have claws on their feet.”
Remind students that a hypothesis is just a guess – they need to conduct observations to find evidence to support or undermine their hypothesis. This is the underpinning premise of the scientific method.
Next, asks the students to discuss what they would look at under a microscope to test their hypothesis.
Use the Provided Worksheet:
When the students peel off to complete this step, have them complete Questions 1 and 2 on the worksheet. This can help them stay on track and be a visual guide for their learning.
Teacher Tips:
- If you have one student, work in a pair with them but allow them to come up with answers while guiding or ‘scaffolding’ their thoughts.
- If you have a group of students, encourage them to break off into pairs or small groups to come up with their hypothesis. When the group comes back together, have each pair share their thoughts with the class.
3. Setting up your Microscope
This next step involves testing your hypothesis. The students will look at the fly’s leg under a microscope and see if they can identify any features that may support or challenge their hypothesis.
Microscopes are expensive and fragile. Ensure your students are taught how to use microscopes effectively, including:
- How to Carry a Microscope
- How to Use a Microscope
You can use this printable and place it beside each microscope so students have a resource to work from.
Central to your steps here include:
- Turn the dimmer to the lowest level before turning on the microscope.
- Set the microscope stage to the lowest position possible.
- Start with the 4x scanning objective lens in the observation position (this is the lens with the red stripe).
- Place the prepared slide on the microscope stage with the fly leg directly over the open diaphragm.
- Ensure the sub-stage light is on and now turned to high power.
Check the students’ microscopes are all set up correctly before allowing them to move on to Step 4.
4. Zooming-In
When zooming-in, students should know the correct procedure. You can read my guide on how to use a microscope here again, and provide one printable beside each microscope as a resource for students.
Central to your steps here include:
- Slowly raise the stage using the coarse focus knob until the specimen is in focus. Re-center the specimen.
- Rotate the turret clockwise until the 10x low power objective (yellow stripe) is set.
- Re-focus using the fine focus knob. You may also need to move the slide to re-center the specimen at this stage.
- Repeat steps 7 and 8 if you feel you need to use the 40x high power objective.
- Move the slide so you can see the tip of the fly’s leg / foot.
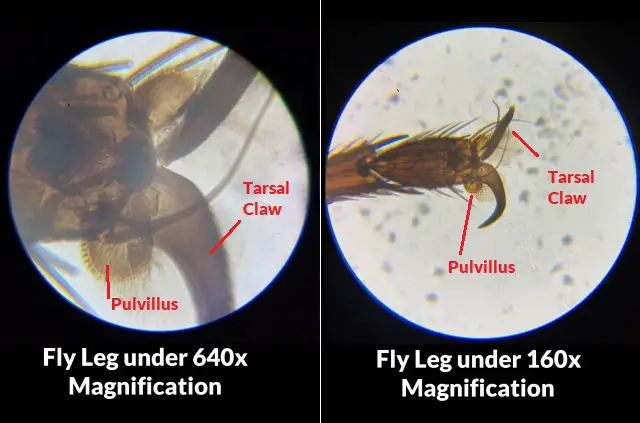
Note that you may prefer the Low Power over the High Power objective. If you zoom in too far, you might not be able to see the whole foot. See, for example, my observations below. The left is 640x, and the right is 160x:
Use the Provided Worksheet:
You may like to have the students complete Question 3 of the worksheet before starting this step. This question is specifically provided to remind students to take care when using the microscope.
5. Taking Photographs (Optional) and Drawing your Findings
If you have a microscope camera or even just a cell phone, it can be good to take photographs of your findings. You can print them for poster presentations, save them for slide presentations, or save them for drawing your observations on the observation sheet (see worksheet below – Question 4).
Alternatively, you can have the students simply draw their findings on the Question 4 worksheet section.
Teacher Tips:
- Remind the students to focus on drawing the tip of the leg and what you see that might support or challenge your hypothesis.
6. Question your Hypothesis
Use the prompt in Question 5 of the worksheet to see whether you have more information now that can support or challenge your hypothesis.
Complete Question 5 on the worksheet, focusing on:
- Is there evidence of claws for gripping?
- Are there pads for holding onto the wall?
7. Conduct Follow-Up Research
Now that you and your students have had an attempt at solving the mystery, it’s time to do further research.
You can either have your students go on the internet and research the information or use the below ‘Fact Sheet’ to gather further information.
If you use the below Fact Sheet, have each student read a paragraph each.
After reading the Fact Sheet, either work as a whole class or in small groups to complete Questions 6 – 9.
Fact Sheet
Fact Sheet
How do Flies Walk on Walls? (Answer)
Flies and similar insects walk on walls in a combination of two ways: claws for gripping and pads that secrete a sticky substance.
- Claws. For a long time, we thought flies gripped to walls using claws. And it seems this hypothesis is half true. The claws on a fly’s foot are called Tarsal Claws [1]. These claws can grip onto rough surfaces such as curtains [2]. But, what about silky smooth surfaces?
- Foot Pads. You might not be able to clearly see the pads under your microscope because they’re quite small. Our best images of these pads come from higher-magnification SEM electron microscopes.
The pads on a fly’s foot are called pulvilli (singular: pulvillus). Researchers at Max Planck Institute for Metals Research discovered that these pads have a whole bunch of tiny little hairs called setae [3]. The setae have flat tips that secrete a sticky substance that contains oil and sugar. This sticky substance can stick the legs to just about any surface!
When the flies want to take off or step forward, the rock onto the claws, which peel the foot off the pads and release the flies from their perch.
How do Flies Spread Bacteria? (Answer)
Flies are well-known for spreading bacteria. Flies landing on your dinner plate or food can bring bacteria from the bathroom or rubbish, which you may just ingest! This could potentially make you sick.
It is believed that flies are super spreaders of bacteria because of the pulvilli (those sticky pads on their feet that they use to grip onto walls and ceilings).
Those pulvilli don’t just grip onto the surfaces to hold the flies up. They also collect bacteria, which is then spread all over the place when the fly buzzes off to his next landing spot.
What’s worse is flies are often attracted to the smell of both rubbish and foods, so they’ll often flit between each, contaminating your food.
Glossary of Scientific Terms
Tarsal Claw
A tarsal claw is a claw on the foot of an insect used to grip onto surfaces.
Pulvillus (Plural: Pulvili)
A pulvillus is a pad on the foot of an insect with hundreds of little hairs that each secrete a sticky fluid.
Seta (Plural: Setae)
Setae are tiny hairs on insects. There are special setae on the foot of insects that secrete a sticky fluid that’s a mix of oil and sugar. While the fluid from one seta isn’t all that sticky, there are hundreds of setae on the foot of an animal which each secrete a tiny amount of the sticky fluid, helping insects to grip onto walls and ceilings.
Student Worksheet
Student Worksheet
1. Write a one Sentence Hypothesis for How Flies Walk on Walls
2. What would you focus on under the Microscope to Test your Hypothesis?
3. How do you Find Focus when using a High Powered Lens?
4. Draw what you saw under the Microscope Below
![]()
5. What did you Observe that Supported or Challenged your Hypothesis?
6. Upon Further Research, what Methods did you find that Flies use to walk on Walls?
7. What is the Pad on a Fly’s Foot Called?
8. What sort of Microscope is needed to see the Fly’s Pad?
9. Why do we think Flies Spread Bacteria so Easily?
Conclusion
Remember to pack up the microscopes and place dust covers over them after use. Try to encourage the students to be active in the clean up to promote responsible behaviors.
To conclude your lesson, ask the students to propose another hypothesis about flies, such as “how many eyes does a fly have?” You can set answering that question as some self-study homework.
For follow-up lessons, go to our page on microscopy project ideas where we have dozens of additional microscopy activities.
REFERENCES
[1] https://pubmed.ncbi.nlm.nih.gov/12804721/
[2] https://www.livescience.com/10536-flies-walk-ceilings.html
[3] https://www.photonics.com/Articles/Optical_devices_uncover_how_flies_walk_upside_down/a43722

Hi, I’m Chris and I run things around here! I share all my microscopy experiments, microscope information and tricks, how to guides, and microscope reviews in the articles on this site. Browse around to see what you like (I recommend the experiment ideas section) or connect with me on any of the social platforms listed below.