
 About this Article: Hi, I’m Chris – an amateur microscopist. This information is stated as personal opinion for my circumstances and does not constitute professional advice to you and your circumstances or guarantee quality or fit for purpose of the following products. Use of this website is governed by our Disclaimer, Terms and Conditions and Privacy Policy posted in the footer of this website. As an Amazon associate I earn from qualifying purchases.
Welcome to my gear list! Every item on this page I own and use. All the photos are of my own gear.
These are products I bought after a lot of research. You’ll notice they’re featured on many of my ‘best of’ lists – because I only recommend products I actually own and use. And they’re the products I recommend for people diving into microscopy as a hobby.
So let’s get started with my list of my favorite gear. Here’s a quick overview of all the gear I own:
|
My Gear |
Product |
Description |
Where to Get It |
|
1. Trinocular Microscope |
Amscope T490B |
This is my favorite professional quality microscope. It’s great for photography (set it up with a DSLR to microscope adapter) as well as an awesome stage and lighting setup. |
|
|
2. Kids Microscope |
Levenhuk Rainbow 50L PLUS |
This is my favorite kids microscope. It’s not as advanced as the Amscope T490B, but has less of a learning curve and is more than enough for children. |
|
|
3. DSLR to Microscope Adaptor |
CA-CAN-NIK-SLR |
This is the most versatile camera to microscope adapter on the market, fitting both Canon and Nikon DSLR cameras. |
|
|
4. Microscopy Experiment Kit |
Levenhuk K50 Experiment Kit |
This microscopy kit will get you started on a range of experiments including looking at brine shrimp and some prepared slides. |
|
|
5. Blank Slides Set |
Amscope Blank Slides |
Blank slides are blank slides are blank slides. Get a set from any top brand. I like Amscope. You’ll need them to set up your experiments. |
My Gear List
1. My All Round Compound Microscope – AmScope T490B
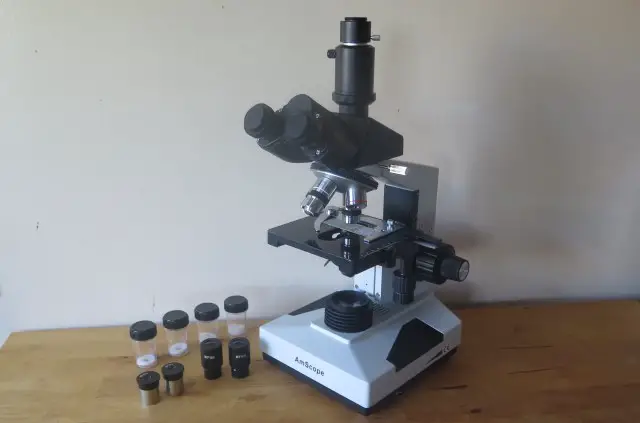
It took me WEEKS to finally settle on the Amscope T490B (you can get it here). Literally weeks. I looked into just about every microscope on the market before settling on the T490B. (If you don’t believe me, look at my over 20 microscope reviews on this website that I conducted before settling on this choice).
I’m so glad I settled on the T490B. It’s amazing.
This microscope, in my opinion, balances price point and quality really well. You’re getting:
- A nice 1.25NA Abbe condenser
- Iris diaphragm
- Mechanical stage
- Up to 2000x magnification
- Oil immersion capability
- Siedentopf head
- Third ocular tube for photography
Straight down the line, this microscope ticks all my boxes for hobbyists and even professionals.
One big thing you’ll notice about this microscope is that it’s trinocular. I bought a trinocular microscope because I like taking photos through the top ocular tube.
Just a quick word for the wise: nearly everyone who buys a binocular compound microscope regrets not paying for that extra ocular tube. Taking photos of your specimens is just so satisfying. Don’t deny yourself that satisfaction over a few dollars at the checkout!
But.
If you are adamant you don’t want that third ocular tube, you can step down to the binocular Amscope B490B or – even cheaper – the binocular Amscope B120C. I like both of these microscopes as cheaper alternatives for a workhorse microscope. They’d both be perfectly good for most practitioners (vets, etc.) and hobbyists who just need a hard working and high quality bright field compound microscope.
2. My Kids Microscope – Levenhuk Rainbow 50L Plus
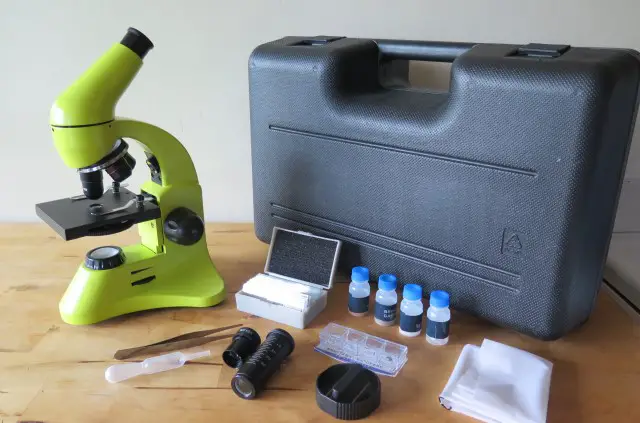
I recommend the Levenhuk Rainbow 50L Plus as a a simple, easy-to-use microscope for kids.
For me, the difference in learning curve between the Levenhuk Rainbow 50L Plus and the Amscope T490B was night and day. You get the Levenhuk Rainbow 50L Plus out of the box and you’re looking at specimens within 5 minutes. There’s no construction involved, and because it’s got a simple stage and single focus knob, it’s easy for anyone to use – even kids.
And while the Levenhuk Rainbow 50L Plus doesn’t have the nice advanced features of the Amscope T490B, it’s got enough features to do a wide range of bright field experiments.
The good news: you get a bunch of experiments and prepared slides right out of the box!
I’d also caution you about the quality of some other entry-level kids’ microscopes.
I’m not going to bad mouth any brands, but I would say do your research: the objective lenses of other microscopes under $100 are pretty poor quality.
As for downsides, well I think most adult hobbyists wouldn’t be satisfied with this one. The major one is that it doesn’t come with a mechanical stage. Mechanical stages are so important for user experience, and I do miss it every time I use the Rainbow 50L Plus. And I’m not going to lie – it’s nowhere near as good as the Amscope T490B. It doesn’t have DIN standard objectives, a port for a camera, or a substage light condenser.
But as a microscope for kids, it’s my favorite.
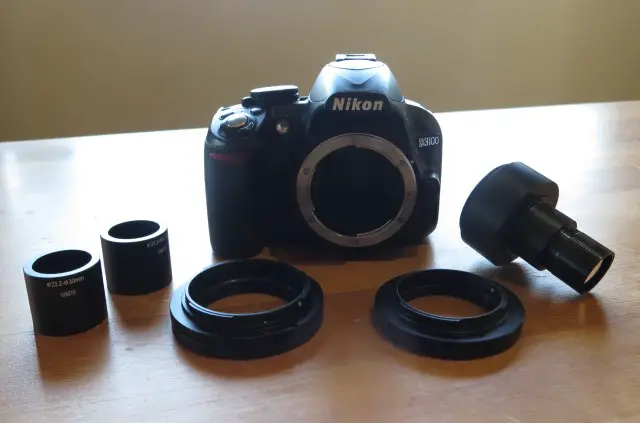
3. My DSLR Camera to Microscope Adapter – CA-CAN-NIK-SLR
Everyone wants to take photos of their experiments. Even if you say you don’t, give it a few weeks and you’ll really want to record and share your findings with friends or on one of the many Amateur facebook groups.
For me, I take photos to share them on this website and my YouTube channel! As a teacher, I also like to share the images when teaching about how to do experiments or biological concepts.
There are a few options for taking photos of your findings:
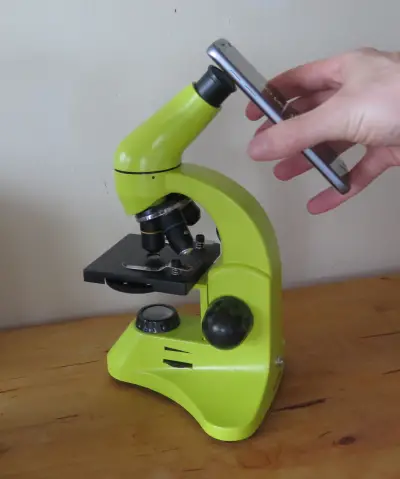
- Hold your cell phone camera over the eyepiece and take some snaps.
- Get a dedicated microscope camera.
- Get a DSLR camera to microscope adapter.
Of these three options, clearly the cell phone choice is cheapest … but it also renders the lowest quality image.
Next are dedicated microscope cameras. But they also have their own downsides. The primary downside is that they’re damn expensive. If you want a decent image, you’d be needing to get a 5.1MP microscope camera which will set you back around $400 – $600.
But there’s another downside of a specialist microscope camera. They nearly all connect to the computer via USB 2.0, which isn’t fast enough to handle videography. The frame rate, frankly, sucks.
In my opinion the best solution is to get a DSLR to microscope adapter, so long as you have a DSLR camera already. The pros are:
- The image quality is superior. The average resolution of a DSLR cameras is 25 MP. That’s exponentially better than a higher-end 5.1 MP dedicated microscope camera.
- The adapter is cheaper to get than buying a dedicated microscope camera. You’re looking at about $500 for a microscope camera. A DSLR to microscope adapter is closer to $120.
- You can record excellent video. You don’t face the USB 2.0 bottleneck problem that microscope cameras face.
Here’s how it looks when all set up on my Amscope T490B:

The DSLR to microscope adapter I own is Amscope’s CA-CAN-NIK-SLR. It’s a catch-all microscope adapter because:
- It can fit just about any Canon OR Nikon DSLR camera.
- It can fit into all three major ocular tube sizes: 23.3mm, 30mm and 30.5mm
It’s therefore a multipurpose adapter that can go into just about any DSLR camera AND any compound microscope.
If you buy the CA-CAN-NIK-SLR adapter, you can use my installation guide to figure out how to get started with it.
If you are sure you’re only ever going to use a Nikon or only ever a Canon, Amscope also has the CA-CAN-SLR model (only for Canons) and CA-NIK-SLR model (only for Nikons) and you can save about $10.
4. My Beginner Microscopy Kit – Levenhuk K50 Experiment Kit
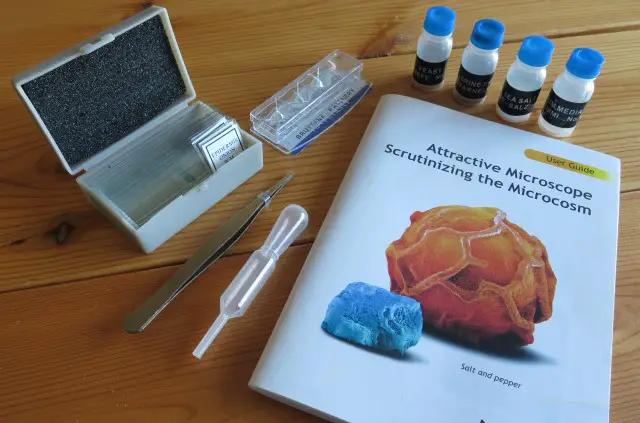
Once you get your microscope, then what? If you’re getting into microscopy as a hobby, the best (and easiest) way into the hobby is to get an experiment kit. It will give you a structured introduction to the basics of microscopy and a few prepared slides to get started right away.
I got the K50 experiment kit, which came with my Levenhuk Rainbow 50L Plus. But you can also purchase it separately from here.
This experiment kit comes with:
- Instruction booklet for all experiments (“Attractive Microscope. Scrutinizing the Microcosm”)
- Bottle of brine shrimp eggs
- Hatchery for birthing the brine shrimp
- A very basic microtome (helps with cutting thin slices to place on your slides
- 5 blank slides
- Bottle of yeast
- Bottle of sea salt
- Bottle of pitch
- Prepared slide: house fly leg
- Prepared slide: onion cells
- Prepared slide: cotton stem
- Prepared slide: tree trunk slide
- Prepared slide: pine needle
- Forceps
- Dropper
You can get perfectly good alternative beginner sets for compound microscopes from Home Science Tools and Amscope, too.
5. My Spare Blank Slides – Amscope 72 Piece Blank Slide Set

Once you’re done with your experiment kit, you’ll need a pack of blank slides. All the specimens you grab are going to be placed on a slide and prepared with a cover slip.
I recommend when you buy your microscope that you get a blank slide set. It’s necessary for when you want to move on to doing experiments like looking at the cells of an onion, seeing bacteria in water, or finding your first tardigrade.
All the main microscopy brands will sell their own blank slide set, and they’re all just about the same. So while I got this Amscope set, it’s no different to a set from another brand. Typically, blank slides are 0.8mm – 1.0 mm thick. One thing to watch out for is to make sure you don’t get single or double frosted slides.
Conclusion
Obviously you won’t want to get all the gear in the above list. For adults, I recommend starting out with the Amscope T490B, DSLR adaptor (so long as you have a DSLR camera) and some blank slides. Once you’ve got those basics, you can get started on some super fun beginner activities.

Hi, I’m Chris and I run things around here! I share all my microscopy experiments, microscope information and tricks, how to guides, and microscope reviews in the articles on this site. Browse around to see what you like (I recommend the experiment ideas section) or connect with me on any of the social platforms listed below.