
 There are two key reasons you need to follow a clear procedure when using a microscope:
- So you Succeed in your Projects: Finding focus on your specimen isn’t as easy as it looks! But if you follow the procedure outlined in this article it will maximize your chances of zeroing in on your specimen to achieve success in your projects.
- So you don’t Damage your Microscope: But a microscope also contains many delicate parts. Careful preparation, use and storage is very important for ensuring you don’t damage the equipment.
In this article, I’ll provide a visual walk-through of the steps required for using a microscope safely and effectively.
How to use a Microscope Properly
1. Transporting and Unpacking
Chances are your microscope will be in storage or in its box when you start the project.
When you carry the microscope, try to carry it in two hands. Place one hand under the base and the other on the arm of the microscope. Try not to put your fingers on any of the lenses or the microscope’s stage. Also try to hold the microscope flat, especially if there are any loose parts or slides on the microscope.
When unpacking the microscope, make sure all the parts are in their right place. The most common things that are missing are the objective lenses, eyepieces, and the head, which is often removed for storage. If you’d like a walkthrough of microscope setup, see here.
2. Dim the Light, Turn it On, Increase Light Intensity
Compound light microscopes have a sub-stage light. This light is usually controlled by a switch and dimmer on the right-hand side of the base of the microscope. In the image below, the switch is highlighted by the red square and the dimmer is highlighted by the red circle:
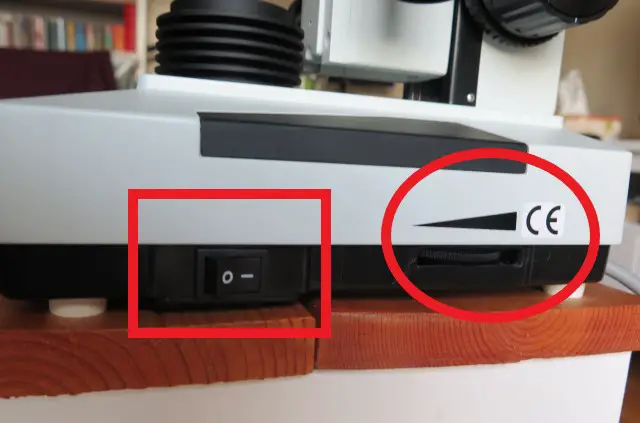
Make sure you scroll that dimmer right to the lowest possible point before plugging the microscope into the wall and flicking the light switch.
The number 1 reason fuses blow on microscope lights is that you turn the light on while it’s on the fullest setting.
The safest way to do it to prolong the lifespan of your light is to turn the light on while it’s fully dimmed, then slowly increase the light intensity over the span of about 3 – 5 seconds. This decreases the chances of the fuse blowing.
3. Fully Lower the Stage
To start your experiment, use the coarse focus knob to lower the microscope stage to the very lowest position. Usually you can do this by rotating the coarse focus knob on the right-hand side near the base of the microscope arm towards you.
Below is an image the focus knobs labelled. You’ll want to use the focus knob:
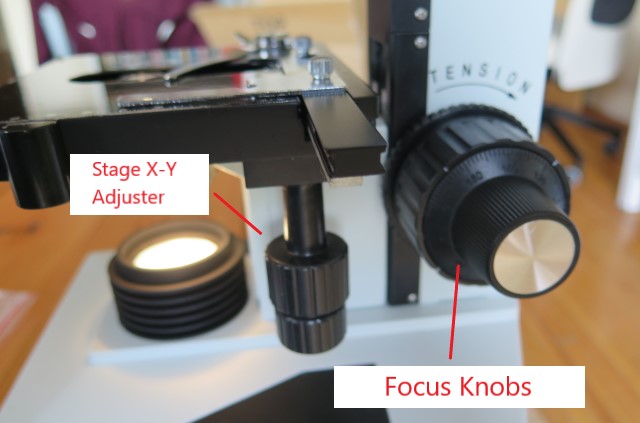
Most microscopes have ‘coarse focus’ which is adjusted by the base of the focus knob. This one adjusts the microscope stage faster. There is also a ‘fine focus’ knob which is adjusted by the tip of the focus knob and moves the stage small distances to get perfect focus at higher magnifications.
4. Place your Slide on the Stage and Center it.
For your experiment, you should have either a prepared slide or a blank slide with a drop of your specimen placed in the middle.
This step involves placing that slide onto the stage correctly.
Your stage will either have a pinch clip that holds the slide from the side, or two overhead clips to pin the slide into place.
Insert the microscope slide onto the stage and clip it in.
Once it’s inserted, you will likely need to do some stage adjustments to ensure the slide is directly above the light that is projecting up from the sub-stage lighting mechanism (usually an Abbe condenser).
If you have a mechanical stage, you can use the knobs below the stage to center the slide. If you have a fixed stage, you’ll need to use your fingers to center the slide on the stage.
5. Set your Red 4x Scanning Objective into Place and Raise the Stage using the Coarse Focus Knob
You will see your microscope has one lens that has a red stripe on it. This is your scanning objective, which is the lowest power of all the objectives on the microscope turret:
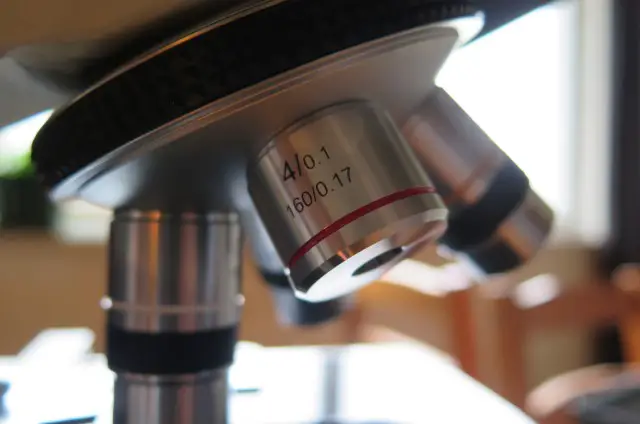
This is the best lens to start with. It will allow you to get rough focus on the specimen before heading up to higher power, but also let you literally ‘scan’ the slide to re-center it before heading to the higher power.
Once the red objective is set directly above the specimen (you’ll feel a ‘click’), you can use the coarse focus knob to raise the stage.
The red 4x lens is the only time you should use the coarse focus knob.
As the stage raises, you’ll slowly start to see the specimen come into focus. Stop once it is focused.
6. Rotate your Objective Turret to the Yellow Low Power Lens (10x)
Most microscopes will have 3 or 4 objectives. For the follow-up steps, you’ll want to rotate your microscope up in power from one objective to the next.
Here is the usual range:
|
Objective Lens Band Color |
Magnification |
Common Lens Name |
|
Red |
4x |
Scanning Lens |
|
Yellow |
10x |
Low Power |
|
Light Blue |
40x – 50x |
High Power |
|
White |
100x – 250x |
Oil Immersion |
This isn’t set in stone – some microscopes have different magnifications, but the above is a general average and the most common magnification levels.
So, for most people this step will involve rotating from the objective with the red stripe to the objective with the yellow stripe.
Once you’re set into the yellow objective, you’ll likely notice the focus has gone foggy again. Slowly rotate the fine focus knob until the focus is back to perfect.
7. Re-Center the Specimen
Between each time you increase magnification, make sure you re-center the specimen. If you don’t, you’ll likely lose your specimen each time you go up a magnification level.
At some point, you’ll realize you’re at the maximum magnification level you really need. If you step up another level, focus, lighting and size will be out. Perhaps you won’t be able to see the whole specimen, for example.
When you’re at this point, you might want to step back to a lower power lens for the best view.
You’re done! Enjoy looking at your specimen.
Advanced Adjustments
To further improve your viewing experience, you can do a few of the following advanced steps:
- Diopter Adjustment: A diopter is useful if you are someone who usually wears glasses. The diopter is designed so you have slightly different focus in one eye than the other. If you know one eye is slightly blurrier than the other, adjust the diopter behind your eyepiece until both eyes are in perfect focus.
- Condenser Adjustment: You may also achieve better quality images if you adjust your condenser and iris diaphragm. This can make the lighting better, but also help to reduce the foggy fuzzy outlines around your images.
Packing it all Away
Once you have completed your session, don’t forget to pack the microscope away carefully. A few of the most common issues I come across are:
- Dim the Light: Just like when you tuned the sub-stage light on, you’ll want to dim it before turning it off as well. This will help protect the light for the next person who turns it on.
- Wipe the Stage: Sometimes some water or other particles end up on the stage. Make sure the stage is completely cleaned off before packing it away.
- Use a Dust Cover: Dust covers protect the lenses from unnecessary build-up of dust that can decrease the quality of images.
- Carry it with two hand: Don’t forget to hold the arm with one hand and the base with another.
Conclusion
Using a microscope is pretty simple once you get used to it, but there are definitely some pretty clear steps around using the lighting and achieving focus that can really enhance user experience. Remember to slowly step-up magnification, use fine focus for higher magnification settings, and be careful with the lighting to ensure you don’t blow a fuse.
Once you’ve mastered these basics, your microscopy projects will be so much more enjoyable!

Hi, I’m Chris and I run things around here! I share all my microscopy experiments, microscope information and tricks, how to guides, and microscope reviews in the articles on this site. Browse around to see what you like (I recommend the experiment ideas section) or connect with me on any of the social platforms listed below.