
Prepared slides are the easiest way to get a taste of the world of microscopy. You can skip all the hard work of finding specimens to look at and use ones provided for you by the professionals!
 I would recommend to all people new to microscopy to get a set of prepared slides. This is especially true if you plan on working with younger children. They often want to see cool things under a microscope, but the learning curve of finding critters in moss and pond water can be a little hard at the start.
So prepared slides are a way to inspire kids’ (and adults’!) scientific minds before you move on to some more difficult microscopy activities.
For this activity, I’m using 5x prepared slides that I got with my Levenhuk Rainbow 50L PLUS. It’s my preference as the best microscope for kids for a variety of reasons, but one key reason is their provided experiment kit is really fun.
The 5 prepared slides in the kit I received contained:
- A House Fly Leg
- Onion Cells
- Cotton Plant Stem
- Tree Slice (Pine Tree)
- Pine Needle
For this activity, we’re going to take a look at all 5!
> This article is from my series on simple microscope projects for beginners
Prepared Slides Activity for Microscope Beginners
Activity Objectives
The objectives of this activity are:
- To familiarize yourself with how to use a microscope
- To practice focusing the microscope on your specimens
- To identify why high magnification isn’t always best
- To spot cells and cell nuclei
- To inspire interest in microscopy by viewing microscopic patterns in nature.
What you Need
- A compound light microscope. For this experiment, I’m using my Amscope T490B so I can take photos, but you can also use an entry-level model like the Levenhuk Rainbow 50L PLUS.
- A set of prepared slides. There are many prepared slide sets available online. I’m using the 5x prepared slides that came with my Levenhuk Rainbow 50L PLUS.
Setting up the Microscope
To get your microscope ready for use, follow the procedure below:
- Turn on the sub-stage light. Make sure the dimmer is set to the lowest setting so you don’t blow the bulb when you turn it on. Then, slowly turn up the light to its highest point.
- Lower your stage to its lowest possible setting. You can use your coarse focus knob for this. Usually to lower the stage you turn the knob toward yourself.
- Place your first slide onto the stage. My first slide will be the fly leg. Make sure the slide is secured by the stage clips.
- Center the slide. Make sure the specimen you want to be looking at is sitting right above the light source. You should be able to see that the specimen is lit up by the sub-stage light.
- Set the red striped 4x objective lens (the ‘scanning lens’) to the viewing position. You always want to start with the lowest power lens for best results.
- Slowly raise the stage using the coarse focus knob until you achieve focus. As you raise the stage, keep looking through the eyepiece. As the stage raises, you will slowly see the specimen come into focus. Stop when the focus is achieved.
- Rotate the objective turret to the 10x low power objective lens. This will increase the magnification but will also likely lead to loss of focus. Use the fine focus knob (if you microscope has one) to adjust the focus again until it is clear. Most specimens in this activity will only require the low power lens to view them.
1. Looking at a Fly Leg Prepared Slide
The first prepared slide we’re looking at is a fly leg. Follow the above procedure to take a close look at the fly leg.
At 100x magnification you should be able to very clearly see the hairs on the leg of the fly:
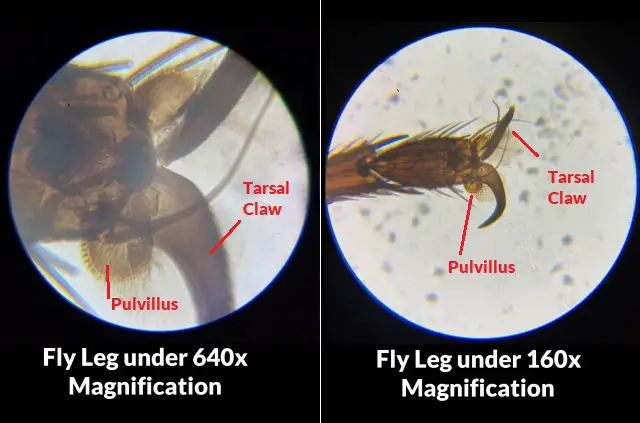
Scan along the leg of the fly until you reach its foot. This will be the very thin, pointy end. You should also be able to see two claws.
Here, pause and take a look at how the foot of the fly is constructed. It doesn’t have five toes like us. Instead, it has two tiny little claws called tarsal claws. You might also be able to see two pads behind the claws. The pads are called Pulvilli.
This prepared slide provides a good lesson in “How flies walk on walls”. The fly uses both the claws and the pulvilli to achieve this. The claws are used on rough surfaces like curtains to claw their way up.
But on smooth surfaces and ceilings, the fly relies on the pulvilli. On each step, the hundreds of tiny hairs on each pulvillus (called setae) excrete a sticky substance made up of oil and sugar. This substance helps the fly literally stick to surfaces.
Each step the fly takes involves using the claws to peel its stuck pulvilli off the surface, then as the leg goes back down again, it re-sticks to the surface.
> Get the Full Lesson plan and Worksheets for this Activity Here
2. Looking at an Onion Cell Prepared Slide
Onion cells are one of the most exciting of microscopy activities for beginners. This activity is the first one you do where you can actually spot not only cells and cell walls, but the nucleus of a cell.
For beginners, you might need to know a little about how cells work.
Cells are the building blocks of life. All plants and animals are built up of cells. For us humans, we’re comprised of billions of cells. But there are plants and animals so small that they’re single celled organisms. Cells are much bigger than atoms and contain many subcellular structures inside them such as DNA which tell the cell how it should behave. Cells reproduce through cell division.
Some of the basic elements of cells include:
- The Cell Wall: A cell wall holds all the gunk inside the cell. This ‘gunk’ is generally cytoplasm and organelles, which are discussed below. The cell wall also protects the cell from damage.
- The Cytoplasm: Cytoplasm is a water-like substance inside of the cell wall which holds all the organelles.
- The Organelles: Organelles are all the sub-cellular structures that float around inside the cell. Examples include minerals and enzymes.
- The Vacuole: A sac within the cell that holds nutrients for the cell to feed off.
- The Nucleus: There is one nucleus inside most plant cells, like onion cells (that we’re looking at for this activity). The nucleus is like the brain of the cell. It holds the DNA that tells the cell how it should behave.
That was a very basic introduction. As you can see from the below image, there can be a lot going on within a cell:
 (Public Domain Image from Wikimedia Commons. The creator of this image is Lady of Hats.)
To learn more about plant cell structure, see here.
Now let’s look at our onion skin to identify the nucleus and cell walls.
Follow the procedure outlined earlier in this article to achieve focus on your onion cells. It should look like this at 100x:
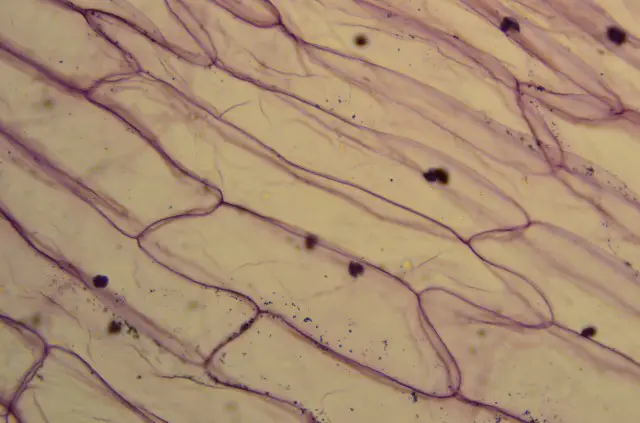
Can you guess which is the nucleus and which is the cell wall in this image? It’s quite clear. The little brown dots are the nuclei, while the purple lines are the cell wall.
While the cell wall looks a similar color to a red onion, that’s not why the cell wall is that purple color. The sample has been died by a microscope slide dye to help you see the cell walls. When preparing your own onion skin slide, you usually drop iodine onto the onion to achieve the same effect. You can even try this yourself from an onion in your fridge, if you have some iodine solution lying around.
You wouldn’t be able to see this cell wall for most other specimens. It just so happens that onions have really big cells, making it nice and easy for us to see them through a low powered microscope objective.
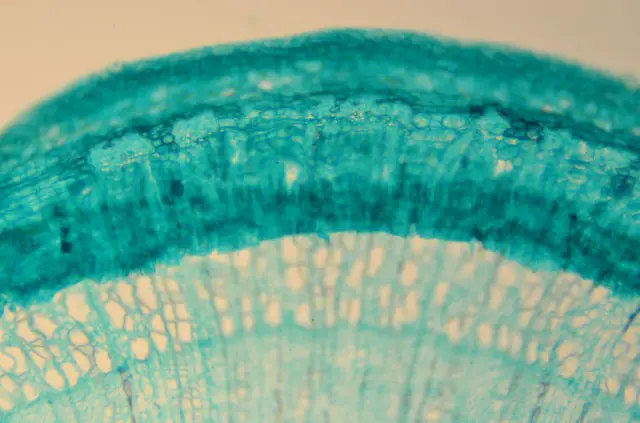
3. Looking at a Cotton Plant Stem Prepared Slide
The next three prepared slides aren’t quite so educational, but they sure are beautiful. For these ones try to take some really good photos to showcase the beauty of life under a microscope. It’s remarkable how miniature life forms itself into patterns and colors that dazzle.
The cotton plant stem is one such beautiful example of life under the microscope.
Place your cotton stem prepared slide under the microscope and line it up ready for viewing. Start with the 4x scanning lens and center then focus the specimen ready to step up to the 10x low power lens (yellow band).
With the yellow band objective, you’ll start to see your whole viewport filled up with the beautiful colors of the cotton plant stem:
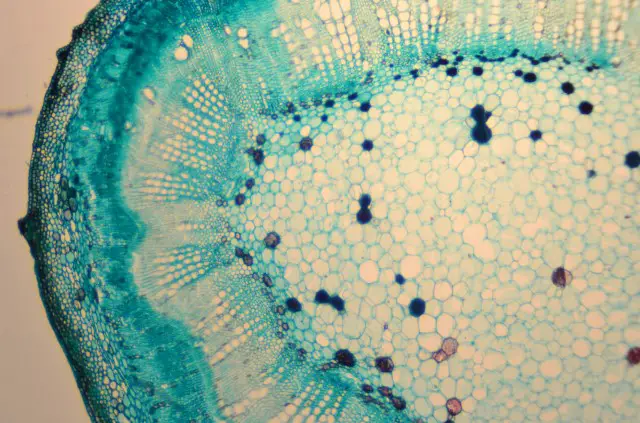
Next, step up to the 40x High Power objective. You won’t be able to see the whole specimen under this high powered objective. And this is a good lesson in why high magnification isn’t always the best magnification. Nonetheless, you can see some more beautiful patterns and even some more cell walls and very faint cell nuclei:

4. Looking at a Pine Needle Prepared Slide
The pine needle specimen renders a very similar image to the cotton stem specimen. Make sure you follow the same procedure listed above. Start by lowering the stage and clipping the prepared pine needle slide (from your prepared slide set) into the stage. Try to center the slide. Set the microscope to the scanning objective (red stripe) and raise the stage using the coarse focus knob until you have obtained focus.
Turning to the yellow striped 10x objective should be enough to get some great shots of this one:
You will notice that the outside rim of the pine needle is a different color to the inside. This is because the outer section is made of substance that absorbs (and therefore reflects) a different spectrum of light. Fortunately for us, this creates a beautiful stained glass effect that’s great for photography:
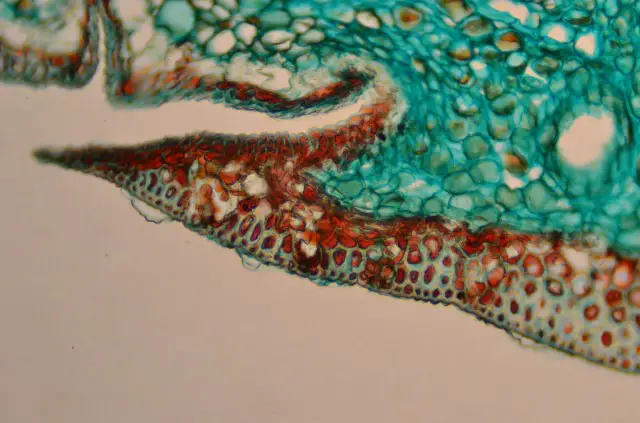
This would be a great chance for you to get started with your first attempt at photomicrography.
While I have an expensive setup using my DSLR camera, you can get started with photomicrography for absolutely free. All you need to do is grab that phone out of your pocket and hold it up against the eyepiece of your microscope. Here I am holding my cell phone up against my Levenhuk 50L PLUS microscope, which is the microscope that these prepared slides came with!
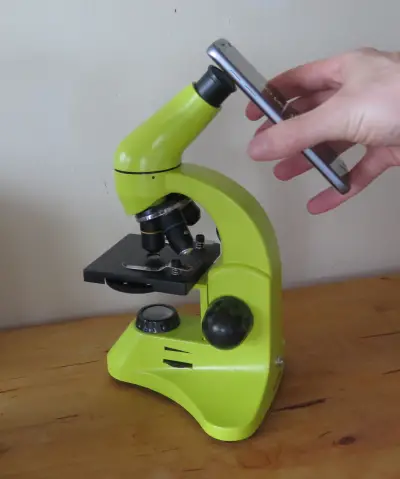
It’s surprising just how good the quality of your pictures can be with just a cell phone. You might notice some fading or color aberration around the rim of your photos, but you should still be able to get some nice images.
5. Looking at a Wood Stem Prepared Slide
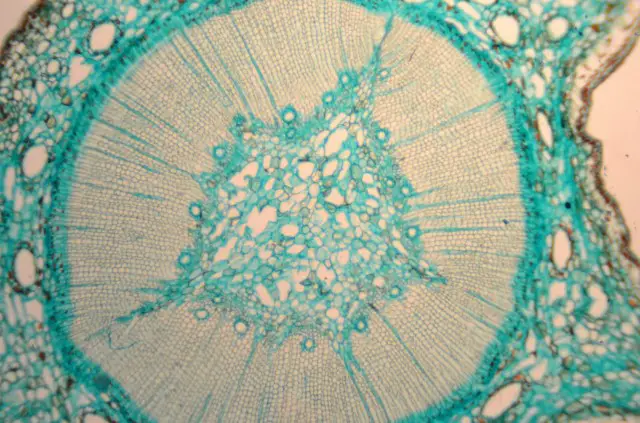
Last but not least is our wood stem slide. Again, follow the procedure to place your wood stem prepared slide on the stage, then use the 4x objective to obtain focus before stepping up to the 10x objective.
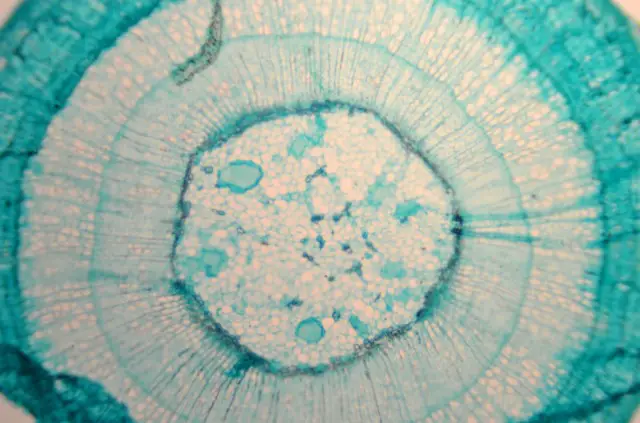
You’ll notice that this wood stem is also a brilliant blue. This isn’t because cotton, pine leaves and trees are naturally blue. Rather, it’s because a dye was used to treat the specimens after they were placed on the slides. This has the effect of highlighting cell walls, causing increased contrast and making it easier to see the details in your specimen.
According to the Levenhuk guide Attractive Microscope: Scrutinizing the Microcosm, the thick outer wall that you can see in this image is in fact dead cells that help to protect the living cells on the inside of the stem. You might know these dead cells as bark!
Conclusion
Microscope prepared slides activities are an entry-way into microscopy. They give you something to look at the moment you receive your microscope. For me, they serve two purposes. The first is to teach you how to use a microscope properly. And the second is to inspire you to love the study of the microcosmos.
Once you’ve completed these experiments, it’s time to move on to some more creative activities that involve preparing your own slides. One fun one is to look at crystalized salt, which delivers some excellent crystalline pattern. Another is to gather moss from stones near your home, place them in water, then observe the critters that emerge out of the moss. If you’re lucky, you might even see a tardigrade!
Enjoy your microscopy and stay inspired!

Hi, I’m Chris and I run things around here! I share all my microscopy experiments, microscope information and tricks, how to guides, and microscope reviews in the articles on this site. Browse around to see what you like (I recommend the experiment ideas section) or connect with me on any of the social platforms listed below.