
Crystals are solid substances found in nature that form a highly ordered molecular structure. We marvel at them because of the beautifully arranged patterns they create, which we call ‘crystal lattices‘.
 In fact, people are so enamored by crystal lattices that they make jewelry and art out of them. They even hike long distances into caves to observe crystal lattices underground.
But for us, all we need is table salt and a microscope.
Today we’re going to take a look at the crystal lattices of salt. We’ll learn just why it is that crystals form beautiful orderly patterns.
The thing I love about this experiment is how easy it is. Just about everyone has some salt in their kitchen that they can use for this experiment.
All you need for this experiment is:
- Table Salt
- A Compound Light Microscope
- A Blank Microscope Slide
- A Microscope Slide Cover Slip (optional)
We’ll look at salt in two states. First, we can take a quick look at salt before it is dissolved in water. Second, we’ll dissolve then re-crystallize the salt to observe the amazing patterns its cells can produce.
Let’s get started!
> This article is from my series on simple microscope projects for beginners
Salt Under a Microscope – Activity Guide
1. Activity Objectives
All good microscope activities start with some objectives. For this project, our objectives are to:
- Hypothesize about how crystals form lattices.
- Observe the crystallization of salt.
- Learn why crystals get their shape.
2. Hypothesis
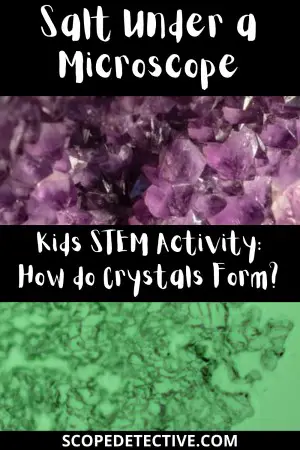
If you’re working with children or students, show them the below image and ask them what they see. They should be able to identify patterns. If prompting is required, ask them to point out the image that seems to have the most patterns on it. Have them describe the pattern.
- Image 1: Crystal Lattice from Unsplash
- Image 2: Salt Crystals taken under my microscope
- Image 3: Crystal Lattice from Unsplash
Depending on the age of the student, try to prompt them to think about why the crystals have that shape. If they know about molecules, ask them what shape those molecules might be, in order to to achieve these repeated shapes.
Possible Answers:
- The molecules all have this shape, and they’re just stacking on top of each other like Lego blocks (this is roughly true).
- The crystals have been formed by water eroding them over time (this is incorrect).
- They are growing down due to gravity or up to the sun like plants (this is incorrect).
3. Observing Raw Salt
Before we create our crystals, take a look at the raw salt under your microscope.
This is an optional activity, but it’s fun and can be done immediately, while the dissolution and crystallization procedure will have to wait overnight.
Take out a blank slide and place a pinch of salt onto a blank slide. You don’t need much salt – just a few little pieces. I also didn’t bother putting a slide cover on my slide, but I was careful not to spill any when I placed it onto the microscope stage.
Once you have prepared your blank slide, it’s time to take out the microscope. You can follow my procedure on my How to use a Microscope Guide. Here’s a brief summary:
- Dim the sub-stage light before turning it on.
- Slowly increase the light intensity of the sub-stage light.
- Lower the stage completely.
- Carefully place your slide of raw salt onto the stage and center it so the sub-stage light is shining through the salt.
- Set the red striped 4x scanning objective into the viewing position.
- Slowly raise the stage until you achieve focus.
- Switch to the yellow striped 10x low power objective and re-focus.
- If you like, take a photo by holding your cell phone up against the eyepiece.
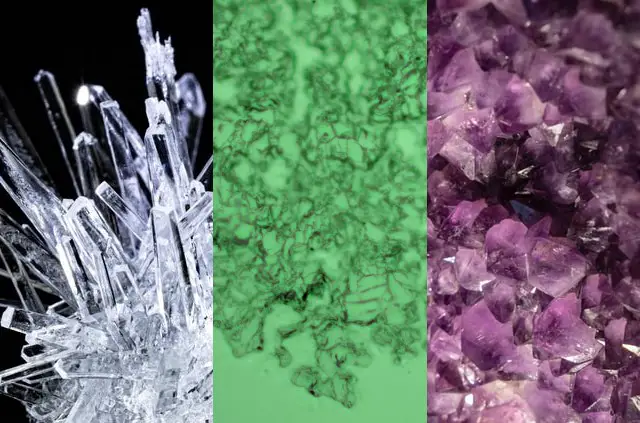
Here is a photo of my observation of the raw salt under a microscope. The left is using the 40x High Power objective, the right is using the 10x Low Power objective:
4. Diluting the Salt
The next step is to dilute the salt then let the water evaporate to allow the salt to crystallize.
Many people dilute salt in a beaker then let the water evaporate. Personally, I find this to be a big waste of time. A simpler procedure is to simply:
- Sprinkle a few pinches of salt onto a blank slide.
- Drop 3 – 4 drops of water onto the slide.
- Place a cover slip of the slide and apply gentle pressure (tweezers can help here).
- Leave the slide overnight.
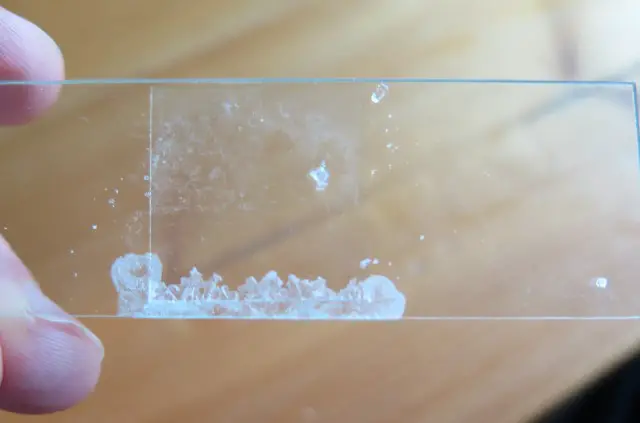
When you wake up in the morning, the water will have dissolved, and you’ll have crystallized salt left over, as shown here. Unfortunately mine seemed to have crystallized close to the edge, but this was not a problem for viewing:
What just happened?
The dissolution of the salt broke it down into its constituent ionic parts, surrounded by the water molecules. This process of dissolution is called solvation, but when something is dissolved into water we give it a specific phrase: hydration.
As the water evaporated, the Sodium Chloride ions bonded again. During the bonding procedure, the ions bonded in a predictable pattern, which as we’ll see next, has led to a crystal lattice.
5. Observing the Crystal Lattice
With your new slide containing the crystallized salt, you can have another go at looking at it under the microscope. Remember to follow the procedure outlined above, involving using your scanning 4x objective first before stepping up to the higher powered objectives and re-focusing using the fine focus knob.
You’ll notice that the big chunks of salt are no longer visible. Instead, the salt has broken down and re-formed into crystals.
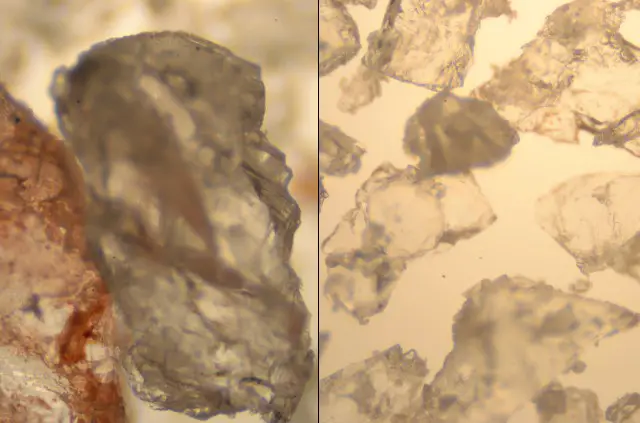
Here’s what I observed (I added the color effects afterwards as the lighting was an off color under the microscope – I should have changed my light filter!).
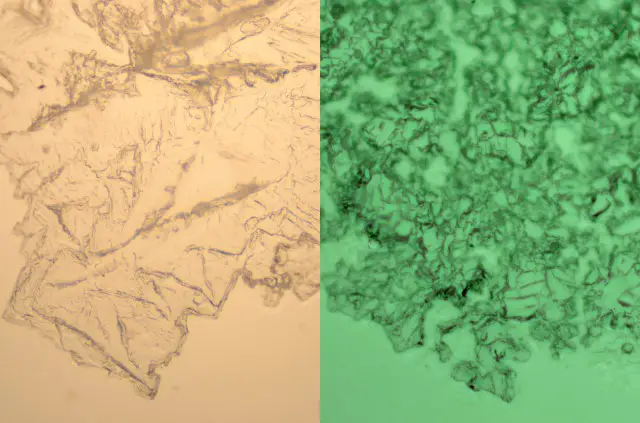
How did the Lattice Form?
Now you’ve seen a crystal lattice form, it’s time to get some answers!
Here’s what happened.
- The dissolution of the salt into the water broke it down into its constituent ionic forms. When dissolved in the water, it’s what we call an ‘electrolyte‘. You might recognize this term from sports drinks – and yes, sports drinks have many dissolved ionic substances like salt in them!
- As the water dissolved, the salt ions left behind began to bond together again. But salt bonds in a very clear pattern. The sodium (Na) ions bond to the chlorine (Cl) ions.
ANSWER: Each chlorine ion is surrounded by six sodium ions, and each sodium ion is surrounded by six chlorine ions. This forms a hexagonal shape, much like the shape on the outside of a soccer ball.
This is a stable molecular structure which the ions naturally gravitate toward.
The lattice grows in this hexagonal shape repetitively. As it grows outwards, we start to see the pattern, which you looked at under the microscope.
Student Worksheet
Student Worksheet
1. Hypothesis: why do you think crystals get their shape?
2. Write down the procedure for the correct use of a microscope.
3. Draw your observation of the raw salt using the form below.
![]()
4. What happened to the salt when it was mixed with the water?
5. Draw your observation of the crystal lattice using the form below.
![]()
6. Did you change your hypothesis after observing the crystal lattice under the mciroscope?
7. Why did the salt form a crystal lattice?
8. What questions do you still have that you could study in a follow-up self-study session?
Conclusion
It’s remarkable just how much order and repetition you can find under the microscope. From the structure of plant stems to the crystalline shape of salt under a microscope, our world is built on molecular level order and repetition.
Reflecting on your hypothesis, did your guess turn out to be accurate? Or did you learn something new through your experiment? Learning new things is central to our scientific experimentation – I hope you learned something new and had fun in the process!

Hi, I’m Chris and I run things around here! I share all my microscopy experiments, microscope information and tricks, how to guides, and microscope reviews in the articles on this site. Browse around to see what you like (I recommend the experiment ideas section) or connect with me on any of the social platforms listed below.