
On a microscope, there are usually 3 – 4 objective lenses. These lenses sit on a rotating turret just above the microscope’s stage.
 The objective lens band colors are universal in order to standardize the function of a microscope. The most common colors are:
- Red band for a 4x scanning objective lens,
- Yellow band for a 10x low power objective lens,
- Blue band is for a 40x high power objective lens, and
- White band for a 100x oil immersion lens.
There are other band colors as well, which are listed in the table below.
Table of Objective Lens Band Colors on a Microscope
|
Objective Lens Color |
Magnification |
Common Lens Name |
|
Black |
1x |
|
|
Brown |
2x |
|
|
Red |
4x |
Scanning Lens |
|
Yellow |
10x |
Low Power |
|
Green |
16x – 20x |
|
|
Turquoise |
25x – 32x |
|
|
Light Blue |
40x – 50x |
High Power |
|
Bright Blue |
60x – 62x |
|
|
White |
100x – 250x |
Oil Immersion |
Common Colors on Objective Lenses
While as noted above there is a wide range of objective lens band colors, below are the four most common types of objective lenses and their colors.
1. Red Stripe (4x)
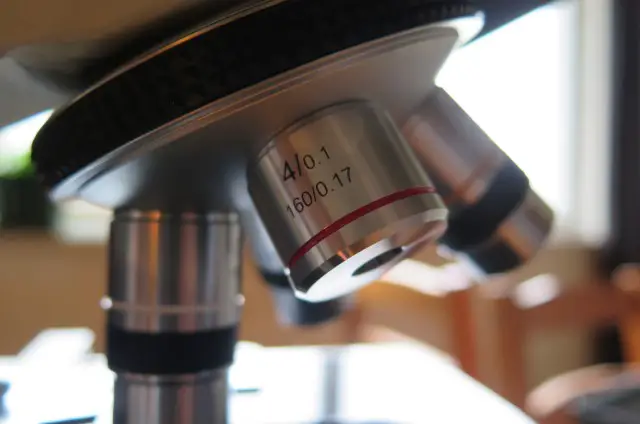
The red stripe is located on the scanning lens. A scanning lens has its name because it’s low magnification, usually providing 4x magnification.
These lenses get their name from the idea that you can ‘scan’ your specimen from a relatively zoomed-out position.
Use this objective first whenever looking at a specimen. Achieve focus using the coarse focus knob then either use your mechanical stage or fingers to move the specimen so your focal point is right in the middle of the field of view.
Then, rotate the turret clockwise to the low power objective lens which usually has a yellow stripe.
2. Yellow Stripe (10x)
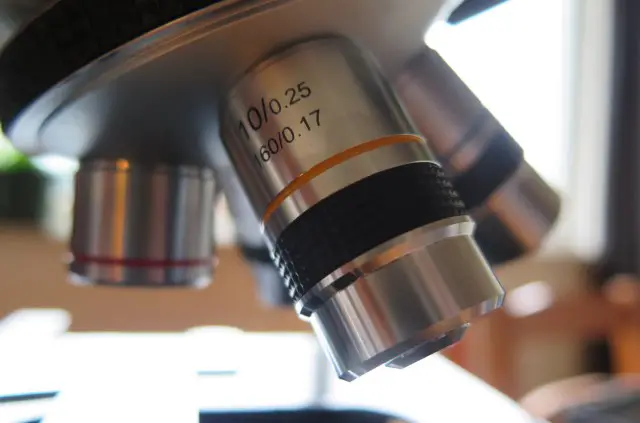
The yellow stripe indicates you are using the low power lens. Combined with a 10x or 20x ocular lens, his lens can be very effective at generating a good view of specimens such as fly legs, onion skin and human hair.
It’s always best to navigate from the red to yellow lens and re-focus (using the fine focus knob) to see whether this lens will provide sufficient magnification for your project.
If you need to step up to the high powered lens with a blue stripe, make sure you re-center your specimen using your fingers or mechanical stage, then carefully rotate the turret clockwise to the blue setting.
3. Blue Stripe (40x)
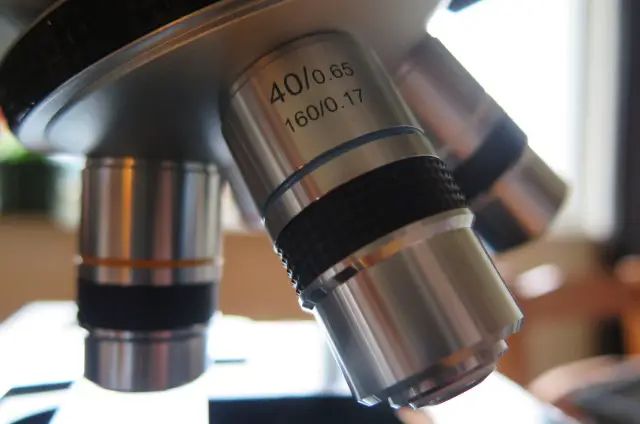
Most microscopes come out of the box with a 40x objective lens. These lenses are called the ‘high power’ lens and are used to look at smaller bacteria and cell structures.
It’s often the case that the high power lens is too much power for your specific project. More magnification isn’t always best. You want a good clear view of your specimen and you don’t want to be so zoomed-in that you can’t see all of your target area in your viewport.
Combines with a 10x eyepiece, this lens will achieve 400x magnification. With a 20x eyepiece, it will go all the way up to 800x magnification. This is more than enough for very close-up views of bacteria.
Only use the fine focus knob when working with a 40x high power lens to avoid clashing the lens against the stage. I would also highly recommend getting a 40xs or 40xr spring-loaded (retractable) 40x objective to prevent damage if your lens hits up against the stage or slide.
4. White Stripe (100x)

The objective lens with a white (or sometimes off-white cream colored) band is your 100x oil immersion lens. This lens is rarely used because you’re reaching the physical limits of magnification with these lenses.
With a 20x eyepiece, we’re talking about 2000x total magnification. At this extreme magnification, you often need to use oil immersion method.
Oil immersion involves placing a dab of oil above your specimen and rotating the lens over the oil so you are viewing your specimen through oil rather than air. (Often, you need to place oil between the condenser and the slide as well).
Oil immersion is necessary in these high magnification cases to prevent refraction that can occur when light waves travel through air.
What is the Best Objective Lens for a Microscope?
A good quality objective lens is arguably the most important of the microscope parts.
Objective lens quality varies significantly. As a general rule, the higher quality lenses will, unfortunately, cost more.
But for me, I look out for two important features:
- It’s DIN standard
- 40x and above are spring-loaded
1. DIN Standard Lenses
A DIN Standard objective complies with “Deutsches Institut für Normung”. In English, that means “German institute for standardisation” [1].
The DIN standard regulates the thread diameter and angle (called the whitworth) so you can place any DIN standard objective into a DIN normalized objective turret.
Din standard objectives have:
- A focal tube length of 160mm,
- 7965″ (20.1mm) diameter threads,
- 36 TPI threads per inch,
- 55° whitworth.
Here’s the benefit.
If you have a microscope that accepts DIN standard objectives, it’s easy to buy replacements – just look for any DIN objective as your replacement or upgrade.
Not all microscopes accept DIN standard objectives. Some cheaper ‘kids microscope’ models have poor quality and non-replaceable objectives in the objective turret. Others use the old RMS (Royal Microscope Society) standard, which has a 170mm tube length. This standard is outdated now and hard to find replacements.
2. Spring Loaded Lenses
The other thing I look out for is a spring-loaded objective from 40x and higher. You can tell these objectives because they have an ‘s’ or ‘r’ on their side, e.g. it might read as: “40xs” or “40xr”.
Spring-loaded objectives are designed to retract when they hit up against the slide or stage to protect themselves [2]. They are very important when working with beginners, students or children who are likely to accidentally hit the slide against the objective at some point.
How to Operate an Objective Lens Turret on a Microscope
To operate these objectives, the standard procedure is to:
- Rotate the turret so the lowest power objective is set in the viewing position. This is usually the objective with the red colored lined.
- Focus the microscope using the coarse focus knob.
- Ensure your specimen is centered in your viewport.
- Rotate the turret clockwise to the next higher power objective.
- Use the coarse focus knob to readjust focus.
- Repeat steps 3-5 until you have magnification and focus you want.
Remember to only use the coarse focus knob when working at higher magnifications. This will minimize the chance that you’ll smash the stage or specimen slide up against the objective, which may cause damage to the lens.
Conclusion
The color bands on a microscope’s objective lens allow you to quickly identify the lens’s magnification from all angles. The most common colors are red, yellow, blue and white (in order of magnification form lowest to highest). Start with the lowest magnification and work your way up until you have the optimal magnification for viewing your specimen, remembering ultra high magnification isn’t necessarily always best.

Hi, I’m Chris and I run things around here! I share all my microscopy experiments, microscope information and tricks, how to guides, and microscope reviews in the articles on this site. Browse around to see what you like (I recommend the experiment ideas section) or connect with me on any of the social platforms listed below.